
Infant CPR For Choking
During the first year of a baby’s life, there are loads of milestones that need to be achieved. With each new phase, comes a new excitement and challenge. When your baby is small, he is happy just eating and sleeping. But as he grows up and gets moving, he will explore the world around him and put things in his mouth, mostly whatever he can find. Here comes the new challenging task of keeping your little one safe and protecting him from unwanted trouble and how you can avoid extreme circumstances by learning the infant CPR methods!
Infants under the age of one get into trouble pretty often. They put things in their mouth, stick up little toys up their nose or ears, fall from stairs, get entangled in wires and cords or have things fall upon them. Of all these the most troublesome is putting things in their mouth, as they can choke on them.
You can only wish that you never have to use techniques like infant CPR but as a mother, you must know what is to be done in case your baby chokes on something. This piece of information might help you save a baby’s life someday.
What is Infant CPR?
CPR is cardiopulmonary resuscitation and it is the most important first aid for infants. CPR is a life saving procedure to revive a child who shows no signs of being alive – unresponsive or not breathing. The procedure involves chest compressions and artificial breaths which kick start the circulation of oxygen rich blood within the body. If the brain is unable to receive oxygen for a few seconds, there may be serious complications. This is prevented by circulation of the oxygen rich blood till the emergency team arrives and takes over the situation.
Indications for CPR
- The child may be chocking due to some obstruction in the airway. This could be due to a food bolus or a small toy that the baby may have put in the mouth.
- Allergic reaction causing swelling of the mucous membrane in the throat that obstructs breathing.
Steps To Perform CPR On An Infant
- Check for Response: The first step is to check for signs of responsiveness and breathing. Call out the child’s name loudly and then tickle the sole and look for any sign of breathing on the chest wall. If there is no response, have someone call the emergency services and begin the infant CPR yourself. Before you begin, ensure that the child is not bleeding from anywhere. If there are signs of bleeding, then control the bleeding first. Lay the child on a firm surface on the back and begin the infant CPR process.
- Chest Compressions: To give chest compressions, keep one hand on the forehead of the baby and the other hand on the chest. Place two fingers on the centre of the chest, below the nipple line. Give the compressions with uniform strength. The movements should be smooth and not jerky. After each compression, let the chest wall come back to normal. Give 30 chest compressions at a time.
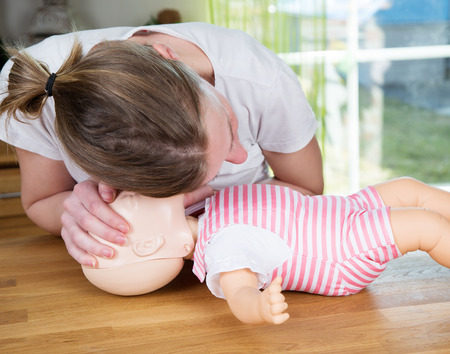
- Rescue Breaths: Keep one hand on the forehead and straighten the airway. Keep the other hand on the chin so that the mouth is open. Now take a deep breath and blow air into the nose and the mouth of the baby for one second. Look for signs of breathing on the chest wall. If the chest wall does not rise, then it indicates that the airway is blocked. Repeat the rescue breaths till you see the chest wall rising. After a few breaths, check the mouth for any object that could be the cause of the blockage.
Protocol for CPR
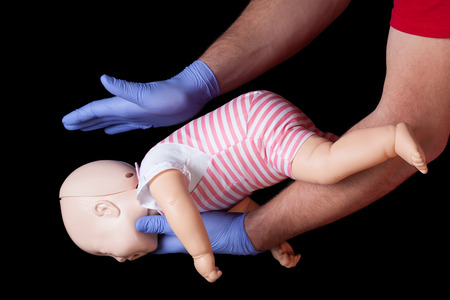
Check for signs of choking: Check if the child shows signs of chocking that is coughing and gasping for breath as if something is stuck in the throat. He may turn blue. In such cases, turn the baby so that his head is lower than the chest and his back faces you. Now give back thrusts so that the lodged piece comes out. After that you may give chest rubs alternatively. This will ensure that any small piece or food that is stuck up is coughed out. If this doesn’t work, proceed to infant CPR.
CPR Ratio: You must continue to perform CPR in the ratio of 30:2 that is 30 chest compressions and two rescue breaths. You must do so until the emergency personnel arrive and take over the situation. If you notice any signs of life, you can stop doing the CPR.
AED: CPR can also be stopped once an AED (automated external defibrillator) is available on the site and ready for use. After two minutes of CPR that is 5 sets of chest compressions and 2 rescue breaths in between, you can either continue or take the help of some other person.
CPR Training and Certification
There are numerous online cpr training courses available these days to train healthcare professionals and accessory medical staff. Different institutions offer courses like cpr bls certification, cpr1st aid certification, cpr trainer course, basic first aid certification and bls certification classes.
The main aim of these online cpr courses is to equip the person with the ability to handle an emergency situation either alone or with a team. The persons who make use of these courses are EMTs, paramedical staff, medical personnel, lifeguards and other healthcare personnel who are in charge of the emergency department.
There is a BLS(basic life support) course that is offered by the National CPR foundation. This course aims to teach life support techniques for adults and infants. There are online modules that the student needs to complete and at the end of the course is a test for assessment. Once you clear the test, a grade is allotted to you. You are given a BLS certification that you can print online as a proof of your successful completion of the course. This certification gives an edge to healthcare providers and medical personnel as it increases their scope of services. It makes them more capable of dealing with emergency situations and better infant child care.